In our previous Git Tutorial, we got introduced to Git. We learned its purpose, we tackle the types of virtual control system and different Git environments. We learned about the different configuration levels. We learned how to configure and initialize Git, we also get to stage, commit, update, remove, rename, and track files using Git, and we also knew how to ignore files using .gitignore. If you haven't read part 1, it would be best to go back and read it before continuing to this tutorial, as this is merely the continuation of the first part and if you haven't gone through that part, it would be difficult to understand these remaining topics. To read part 1, go here.
If you already learned the first part, please continue reading.
Git Status showing short summary
In the previous tutorial, we learned how to use git status to get the status of our repository. The report it displays appear to be long though. So here, we're gonna learn how to get a short summary version of that report.
First, let's do:
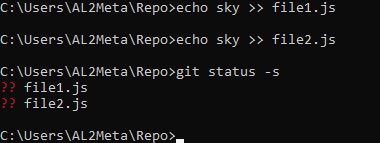
echo sky >> file1.js
echo sky >> file2.js
We created two new dummy JS files named file1.js and file2.js. Now let's check the status of our repository using git status, but this time, let's try adding an -s suffix.
git status -sAs you can see, what we got here now is a short summary of our repository's status showing:
Let's try adding file1.js to index (staging area) by typing git add file1.js. Then, let's run git status -s again.
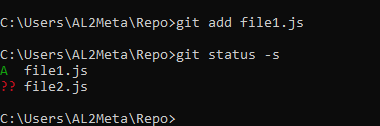
Well, it now has a file1.js marked in green A in the report. "A" stands for "added" while ?? stands for untracked file(s).
Now, if we proceed to commit and call git status again. We'll no longer find the file1.js in the report, leaving us with an untracked file2.js file.
This time, let's try to modify file1.js by sending the command:
echo blue >> file1.jsIf you call git status -s, you'll find this:

Now, we have file1.js under a red M. So what does M means? Well, M stands for "Modified". It means that file1.js in work folder is not similar to the one in the index.
If we do git add file1.js to update the one in the index and call git status - s again. Notice that the letter M turns to green. This means that now, file1.js in work folder and index are the same, but file1.js between the snapshot and the index are different.

Let's modify file1.js in work folder again by typing:
echo color >> file1.jsDoing another git status -s will get us this:

Now, we got one M in green and one M in red for file1.js. This means that work folder has a different version of file1.js to the one index has, and index's file1.js is different or appears to have been modified when compared to the version of the one in the snapshot.
Doing git add file1.js will turn file1.js' report back to green M on next git status -s call.
Now, let's add file2.js to staging.
git add file2.jsDoing this will now give us:

This means that file1.js does not match the one in the snapshot, and file2.js has been added into the index, but it cannot be found in the snapshot.
If you delete file1.js from working, you will get a git status report like this:

D in that report is for "Deleted". It means that file1.js has been deleted from the work folder.
Here's the summary of all the characters and what they mean.
'' - Unmodified
M - Modified
A - Added
T - file type changed
D - Deleted
R - Renamed
C - Copied
U - Updated but unmerged
? - Untracked
It's also important to note in the report that the letter to the left represents the snapshot vs staging changes, while the letter to the right corresponds to the changes between the work and the staging area.
For the full list, see Git Status Documentation.
Comparing Version History
Before anything, let's do this: (be sure to follow everything so we'll be on the same page)
echo sun > test1.txt
git add test1.txt
git commit -m "Your Message"
echo moon >> test1.txt
git add test1.txt
The series of commands we just entered will create a file called test1.txt. We then add this to staging and then committed it. But then we modified the file in the work area, then added it to index for review. We would now try to compare the staging to the next commit.
To see the changes in the staging area versus the next commit, the command to use is:
git diff --stagedThe command will output this:
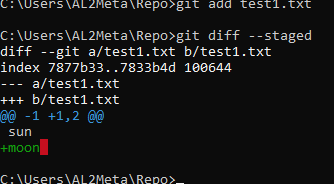
Here's the explanation as to what this output means...
diff --git a/test1.txt b/test1.txt - means that Git is comparing two copies of the same file. This corresponds to old copy and new copy. One from the snapshot (old) vs one from staging (new). Where "a" is the old and "b" is the new one.
index 7877b33..7833b4d 100644 - this is the identifier.
--- a/test1.txt - means there is an impending change for the old copy.
+++ b/test1.txt - means that the new copy has some changes for the next commit.
@@ -1 +1,2 @@ - this is the header with some information about what parts of our file has changed. The change here is only one line. If there are too many lines to be changed, Git is not going to show the entire file, it's going to divide that file into chunks, and every chunk will have a header. The first prefix here is for the old copy, and the second prefix is for the new. In this example, it means that line 1 is to be replaced or extracted in the old copy, and from line 1, 2 lines from the new are going to be used to replace.
sun - sun in white indicates that this has been retained. If this is to be changed, it will appear in red with a minus sign.
+moon - is to be added.
For another example, let's say we have this result:
@@ -1,3 +1,5 @@
hello
world
test
+sky
+ocean
In the above example, it means that from line 1, 3 lines are to be extracted from the old copy, while in the new copy, starting from line 1, 5 lines are are going to be used to replace. The 3 lines from the old contain (hello, world, test), while in the new, starting from line 1, five lines contain (hello, world, test, sky, ocean). Of those five, +sky and +ocean are the new items and are the difference between the old and new.
Now what if you get a header like this?
diff --git a/file2.js b/file2.js
new file mode 100644
index 000000..f5e95e7
--- /dev/null
+++ b/file2.js
@@ -0,0 +1 @@
+sky
Notice that the old has -0, 0. This happened because there is no old copy or snapshot of the file yet.
Now, let's try comparing what we have in the work directory with what we have in the staging area. To do this, we need to use:
git diffTo test this out, let's do:
echo forest >> test1.txt
echo mountain >> test1.txt
Doing git diff will get us this:
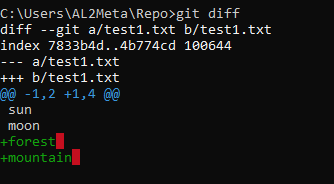
The explanation for this is similar to git diff -- staged, the only difference is that we are comparing work folder to staging area. In this case, staging is the old copy, and work folder is the new copy. So in our example above, "a" is the index and "b" is the work folder file. @@ -1,2 +1,4 @@ means from line 1, 2 lines are to be extracted from staging, while in work, 4 lines beginning from line 1 are going to be used to replace those extracted lines. sun and moon are the same, but forest and mountain has been added in our work folder file and is the difference between the two similarly named test1.txt files.
Visual Diff Tools
There are many Visual Diff Tools available on the Internet. These tools make it easier for you to spot differences between two similar files. Some examples are:
For this tutorial, we're going to use VS Code, so we're going to configure Git to add VS Code as its diff tool. To do this, we need to use two commands. First, we need to assign a name for the diff tool. In this example, we are going to name it vscode. The command for this is:
git config --global diff.tool vscodeThen we need to tell Git how to launch VS Code, the command for this is:
git config --global difftool.vscode.cmd "code --wait --diff $LOCAL $REMOTE"Note that "code" is the command that launches VS Code. In Windows 10, just typing and entering "code" in the command line launches VS Code right away. If you are using a different diff tool or if it doesn't work in your operating system, you may have to set the path that links to your diff tool's executable program.
The command argument --wait tells the terminal window to wait until we are done with VS Code — until VS Code is closed. --diff tells VS Code that we are going to use VS Code for differentiating or comparing files. Finally, we have the last two arguments "$LOCAL" and "$REMOTE", which serves as placeholders for the old and new copies of the file.
Now, let's check our new configuration with the command:
git config --global -eAs mentioned in Part 1 of the tutorial, this command opens up .gitconfig file using VS Code (if you configured VS Code as your code editor). Inside .gitconfig, you'll find additional configurations:
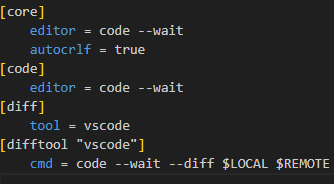
Notice that we now have [diff] and [difftool "vscode"] included in the configuration. Make sure that they are configured exactly like in the picture.
Now that we have configured our difftool, let's try it. Let's do some differentiating by comparing our snapshot/commit file and our staging area file. Type:
git difftool --stagedNotice that our command was kind of similar to git diff, but instead of diff, we use difftool.

When you type enter to confirm the command, you will be asked if you want to Launch 'vscode'. It is asking 'vscode' because this is the name we assigned to VS Code earlier, during our configuration with git config. To launch VS Code, press "y" then "Enter" on the keyboard. This will open VS Code in diff mode.

You'll see something similar to the shell's git diff --staged report we got earlier, but in a much better way as you will be able to clearly determine which lines are different. The left panel shows the snapshot (old file), and the right panel shows the staging (new file) version.
Once you're done reviewing the differences of the test1.txt files, you may close the file to close the VS code instance. If you have more files in staging that have differences to the committed ones, the shell will again ask you if you want to launch vscode, but this time, it's asking if you want to view another file. For this example, let's say we have another staged file called test2.txt. Press "y" then "Enter".

In our example, noticed that there is no difference. This is because we don't have a snapshot of test2.txt yet. This is a new file. This is equivalent to the header @@ -0,0 +1 @@ in git diff --staged.
Now, let's try comparing work and staging in our diff tool. To do this, we need to enter the command:
git difftoolSimilar to git diff, this will compare our files in work folder to the ones in staging.

Earlier, we modified test1.txt in our work folder, but we didn't add it to staging. That is why Git gave us this file to view. Here, it shows the difference of the test1.txt file in staging and the test1.txt file in work directory. As we can see, it shows that we added two new lines containing the words forest and mountain in the modified test1.txt file.
Viewing Version History
Whenever we make a commit, Git logs this commit. To get the log, the command we use is:
git log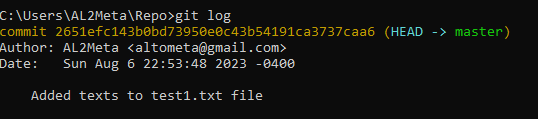
git log retrieves the log of all the commits we've made, sorted from the latest to the earliest. If you've committed a lot in the past, this log will span to several pages, which you can scroll by pressing "Space". You can also press "q" anytime to quit, otherwise, it will keep on going until you reach the end of the page, which will be indicated by <END>. By then you may have to press "q" to exit the log.
Here's the explanation of the log:
The yellow orange line there shows commit, followed by a unique identifier that is 40 characters long that Git automatically generates for us. After that we get HEAD pointing to master. master is the main branch or the main line of work in Git. This is also referred to as the Trunk. HEAD is a reference to the current branch, it tells us which repository we are working on. Here, it shows that we are working on the main repository.
For each commit, you also get the name of the author as well as the email, and the date and time when the commit was made. It will also show the message that was entered during commit. The message tells us what this commit is all about, which is why it is important to enter a message and why it should be concisely written.
Now, let's say we only want to view a short summary of the log. To do this, enter:
git log --oneline
As you can see in the picture, Git is only showing us a one liner version of the log, thus, oneline. It shows a short version of the identifier, the HEAD and the description of the commit. There is no author and date/time information.
The order of appearance of the log is also sorted from latest to earliest by default, but there is a way to reverse the order. The command for that is:
git log --oneline --reverseEntering this will sort the log from earliest to latest, showing our first ever commit first. HEAD will also appear at the bottom of the list.
Viewing a Commit
To view the content of a commit, the command to enter is:
git show (identifier)(identifier) in our command is just a placeholder, you need to enter the identifier number of the commit in there. You can get this number from the log. For example, we wanted to view the commit where we fixed a bug. In our log, the identifier number is 1c20ed5 so our command should be:
git show 1c20ed5Now, you don't actually need to enter the whole identifier ID, you can enter only the first couple characters of the identifier ID, for example 1c20, and Git will read the commit anyways. This works as long as there are no similar identifiers. If there are several 1c20 in the log, you may have to add additional characters to help Git distinguish and determine which specific commit to read.
Entering this command will give us:
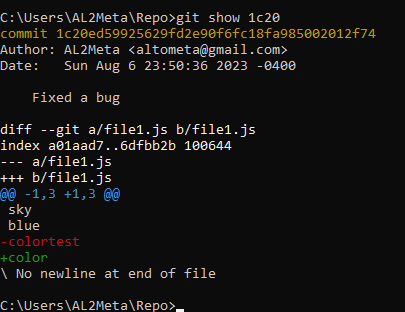
As you can see, this command gives us information about the commit beginning with the identifier, then the name of the author and the email, the date and time, and the message. This is followed by a diff report of the staging and the commit. In our example, it shows that the commit involves file1.js, where we we removed the word colortest and replaced it with the word color.
Instead of the identifier ID, we can also use our reference HEAD to show our commit. For example:
git show HEAD~1This will show the commit done one step behind. Which gives us the same commit report when we entered git show 1c20. That is because ~1 means that from our HEAD reference, which is commit 56a9543, we move 1 step backward, thus, giving us commit 1c20ed5. HEAD~2 means two steps backward as the number is an indicator of how many steps while the tilde (~) means to move backward from HEAD reference.
Now, what if we don't want to see the differences? We want to see the final version, the exact version that is stored in this commit? To do that, we can use this command:
git show HEAD~1:test1.txt

// or if file is inside a directory
git show HEAD~1:bin/app.bin
In our command, we'll use test1.txt as an example since we already stored this file in our commit. Note that the file has to be in the commit, otherwise, the command will give you an error message.
Entering the command will give us this:

It shows that in commit 1c20ed5, test1.txt contains the word sun and moon.
Now, in part 1 of this tutorial, we mentioned that each commit contains a complete snapshot of a work directory, not just changes, but when we ran the git show command, we only see the differences and what was changed. What if you want to see all the files and directories in a commit? Well, for that, we need a different command. It's called ls-tree. Let's try:
git ls-tree HEADEntering the command will show us this:
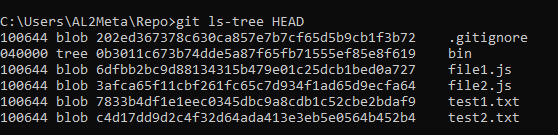
In that output, we can find the files and the directories with their unique identifiers. Notice also that they're categorized as either blob or tree. Files are represented as blob, while directories are represented as tree. All of these are objects that are stored in Git's database.
We can view the objects using git show using its unique identifiers or by only entering a few characters of its identifier as long as there is no ambiguity. For example, based on our list above, let's check:
git show 7833b47833b4 corresponds to test1.txt so what we get is this:
sun
moon
This is what test1.txt contains.
Now, try viewing the directory bin with git show. Based on our list, we enter:
git show 0b301What we get is this:

It tells us that it is a tree and in that tree, it has a file named app.bin.
So using the show command, we can view an object in Git's database, these objects can be:
- Commits
- Blobs (Files)
- Trees (Directories)
- Tags
Unstaging Files
The staging area is where we review the files before making a commit, so what if we realized the changes to a file shouldn't go in the next commit and we want to undo this operation because earlier we use the add command to add this file into our staging area?
Well, there is a command for this, it's called git reset, but some found this command confusing and sometimes dangerous so the developers of Git introduced a new command that works just like git reset but safer. It's called git restore. However, make sure that you are using the latest version of Git, otherwise, this command won't work.
To check your Git version, type:
git --versionIf your version is 2.23 or higher, you may be able to use this command.
Let's have an example:

In our example above, note file1.js. It shows there that there is one modified file.js file in the staging area that is not similar to our commit as indicated by a green M. Let's try to unstage file1.js. To do that, we type:
git restore --staged file1.jsNote that git restore can restore multiple files separated by space. You may also use a pattern to target only files with certain names or extensions, or you may use a period (.) to restore all.
Now, if you enter the command and do git status, you'll discover that:

The modified file1.js file in the staging is gone. So what exactly happened? Well, what happened is that git restore took a copy from the next environment — the last commit in the repository. It took the snapshot from the last area and saved it into staging.
Note that if a file in the staging is not in the last commit, restore will delete the one in staging area. To test this theory, let's take file3.js as an example. In the example above, note that file3.js has been added into staging as indicated by the green A.
Let's do:
git restore --staged file3.jsNow, let's check it with git status -s. What we'll get is:

As you can see file3.js is now an untracked file, that means git restore deleted the file in the staging as we had predicted.
Discarding Local Changes
Now, that we know how to restore files in the staging area, it's time to learn how to restore files in the work folder.
Let's reuse this as an the example:
Note file1.js in that report. As you can see, it shows there that file1.js has been modified in the work folder as indicated by a red M. The fact that Git knows this means that Git has a copy of this file in the staging area.
Now, let's say we want to restore the modified file to what it was previously. For this, we can use the copy from staging. To do this, we use the command:
git restore file1.jsLet's confirm if the process was successful. Let's do git status -s.

As you can see, file1.js is now gone from the report. It means that the file, file1.js, now matches the file1.js file that we have in the index.
Note that git restore only restores files that has a copy in the staging, if there is no copy of that file in the staging, it won't touch that file. git restore doesn't work the same way as git restore --staged, in git restore --staged, Git removes the file in the staging that has no copy of in the commit area. Apparently, this is not the case for git restore.
Now, let's try to use git restore on an untracked file — file3.js. Let's find out if Git would remove it. So, we type:
git restore file3.jsThis is what you'll get:

As you can see, Git can't restore it because it has no copy of it anywhere in its environment. Git doesn't know where to get previous versions of this file because it wasn't tracked.
Now, what if we wanted to remove all untracked files in the repository? This is where the clean command comes in:
git clean
However, even git clean don't want to remove untracked files. Git refuses because it's a dangerous operation. Doing this will delete all untracked files in the repository and Git has no way of recovering them. This is one of Git's fail safes. In order for this command to work, it has to be supplied with an argument that would override the fail safe mechanism.
So let's try to get all of git clean's options:
git clean -hIn the quick help screen, we get options like -f to force the operation to run, and -d for removing whole directories. We can use both of these arguments to force the application to remove files including directories.
git clean -fdIf you enter this command and run git status -s. You will no longer find any untracked files.
Restoring a file to an earlier version
We already know that once Git tracks a file, it stores versions of that file in its database so in case we blow something up, we can always restore the files to its previous version.
For this demo, let's try deleting file1.js using the command:
git rm file1.js
If we run git status, we'll find that file1.js has been deleted. It's no longer in our staging and work area. Now, let's commit it with git commit -m "Deleted file1.js".
Now, what if we wanted to restore that file? When we deleted and committed it, it means that Git also deleted it in the recent snapshot. But as previously stated, Git stores a copy of that file in every commit, so why not restore it from those previous commits? But before answering that let's enter:
git log --onelineThis will show us the log of our commits. In the list, we see that the last commit was deleting file1.js, it is indicated by the HEAD -> master reference. Now's let's open git restore's quick help:
git restore -hIt shows there that git restore can actually take three types of argument. We can supply a bunch of options, we can supply a source, and finally the file. If source is not supplied, Git will restore from the next environment or the next area. So if the file you want to restore is in the work directory, Git will restore it from the staging area and if the file is in the staging area, Git will restore it from the last snapshot or the last commit.
Now, in this case, we want to change the default behavior since we can't restore from the recent commit or from the staging anymore. We need to restore a file from the commit that occurred before the last one. So we type:
git restore --source=HEAD~1 file1.jsProviding that we have copies of file1.js in the previous commits — before file1.js was deleted and committed, this command will restore file1.js from an earlier commit back to the work directory.
So what exactly does our command mean? Our command here means that we restore file1.js from a previous commit, when we still have the file1.js file in our snapshot. The command here tells Git to use the commit instead of the staging as our source, as referenced by HEAD. HEAD points to the recent commit, during the time when we erased the file. But, by adding ~1, we move one step backward, pointing us back to the commit when we still have the file. However, this command will not work if you lost the file several more commits back. In this case, you have to find the commit in the past record that still has the file so you can use it as a source. In which case, you may have to move several more steps backward.
Now, if you did this right, and if you check with git status, you will find file1.js listed as an untracked file once again. Meaning, it's back in the work folder but it's not found in the staging area. This is because we restored directly from the last area, skipping the default commit -> staging process.
End of Basics
And this ends our basic Git tutorials. Note that there are a lot more lessons to take before you can become a true Git pro. We will probably add more of these lessons here in our Notepad in the future. But for now, these lessons are enough to enable you to use Git in your local repository.