![]() This Git tutorial will cover all git basics and will serve as a git tutorial for beginners who have zero knowledge of the application and its usage. Let's start by learning what Git is.
This Git tutorial will cover all git basics and will serve as a git tutorial for beginners who have zero knowledge of the application and its usage. Let's start by learning what Git is.
Git is a free, open source distributed version control system that allows developers to track changes in their codebase over time. It was created by Finnish software engineer Linus Torvalds in 2005, when the proprietary source-control management (SCM) system used for Linux kernel development since 2002, BitKeeper, revoked its free license for Linux development. Git's inception was a response to the necessity for a robust and distributed version-control system, and it has since become the standard choice for managing source code in numerous software development projects worldwide.
Git can be downloaded from the website: https://git-scm.com/. Download the one specifically designed for your OS.
For this git tutorial, we're going to use Git BASH. BASH stands for Bourne Again Shell, which is a pun on the name of the Bourne shell that it replaces and the notion of being "born again". BASH may be for Windows only. However, you may also use your OS' command prompt as an alternative.
Purpose of Git
Git was made specifically for two reasons:
- Track history - it creates a history of the code changes over time. This includes branching versions.
- Merge Code - it can be used to combine the code of two or more developers who are working together.
Virtual Control System Types
- Centralized - code is being stored and tracked in a server where developers connect. The drawback is that If server goes down, work is interrupted. e.g. Team Foundation Server.
- Distributed - code is distributed among the developers. Each user has a copy of the code and they can connect to each other and synchronize their work. e.g. Git, Mercurial
Using Git (Environments)
You can use Git in various ways and environment.
- The command line - as in the case of Git Bash or command prompt.
- Code Editors and IDEs e.g. VS Code equipped with an extension such as GitLens
- Graphical User Interfaces or GUI e.g. GitKraken and Sourcetree
Git Levels
Git has configuration levels. These are:
- System - affects all users and their repositories
- Global - affects all repositories of the current user
- Local - affects the user's current repository
The Terminal
Once Git is installed on your computer, you need to open the terminal to issue Git commands. For macOS, you can access the terminal by pressing Command + Space and type terminal. For Windows, click search icon and type cmd, or look for git bash if you want to use Git Bash.
Configuring Git
The first thing you need to do is to configure Git. The command for this is git config. Also, note that there are three configuration levels (they are explained above - Git Levels). For this one, we are only going to configure our user settings and our repositories so we are going to use global.
First you need to setup your user name. In the terminal type:
git config --global user.name "Your Name""Your Name" is where you should type your name, whatever name you want. If you want a name with a space in between, you need to quote it with " (quotation mark). If your name doesn't have any space, you can enter it without the quotation mark.
Next, you need to setup your user email. To do this, type:
git config --global user.email youremail@domain.comyouremail@domain.com is where you should type your email address. Since we don't have any spaces for this one, there is no need to quote it in a quotation mark.
Now, we need to setup our code editor. For this git tutorial, we are going to use VS Code as an example.
git config --global core.editor "code --wait"code.editor is the code editor we are going to use. We are using "code" in there because code is the command that opens up VS Code. You may have to set the path for other code editors. The "wait" flag tells the terminal window to wait until we close the new VS Code instance.
Our settings will be stored in a file called .gitconfig. You can use a text editor to edit this file. The easiest way to edit it is to type:
git config --global -e-e means to open an editor. --global means it should open our global settings file, which is usually in our user root directory. On the other hand, system settings can be found inside Git's folder, where it was installed. It is inside the etc\ folder. To open it directly, you can enter --system instead of --global.
End of Line
Now, when we commit our code into Git, the characters denoting end of lines may be different in various operating systems. In Windows for instance, the end of line is represented by \r\n (which means carriage return and new line or line feed) while in OS such as MacOS and Linux, the end of line is only \n. If two developers, with one using a Windows OS and another using a MacOS/Linux machine, are updating the code in Git, they may get confused as they may start seeing disappearing end of lines or additional end of lines. Thankfully, Git has the capability to correct this issue using the autocrlf feature.
To configure Git to use this feature, you may type:
// for Windows
git config --global core.autocrlf true

// for MacOS/Linux
git config --global core.autocrlf input
true - means that whenever a \r\n is entered into the Git repository, Git will strip it of the carriage return (\r), but when it sends it back to the user, Git will return the carriage return.
input - means that Git will treat the end of line characters as is.
More Git Config commands
There are more git config commands, but since we are dealing with only the basics in this tutorial, we won't be including them here anymore. However, you may check Git Config's website for more info. You can also type:
git config --help

// Or

git config -h
--help opens up a help page in the browser while -h displays a short summary of all command options inside the shell.
Our repository's root
Our repository's root in Windows is \Users\UserName\ by default. Where UserName is the name of the user of the computer. You can change this directory using this method, but this can be confusing for beginners, so let's just use the default Git work directory as reference.
From the root, let's make a directory called Repo (you can name it however you want, but for now, stick with us. Just name it Repo). To do this, we enter the command:
mkdir RepoThen we go inside that directory using the command:
cd Repo\Users\UserName\Repo\ will now serve as our new work directory or our repository root.
Initializing Git
First, make sure your command prompt is pointed to Users\UserName\Repo. Always make sure that you are in the correct work repository. For the sake of our tutorial, your command prompt should appear something like this: (assuming you are using Windows terminal)
C:\Users\UserName\Repo>To initialize Git, type:
git initInitializing Git will make it start tracking version history. Since we initialize Git inside Users\UserName\Repo, Git will make this path its work repository. It will save some files in this repository to log changes. These files are contained in a hidden folder named .git. To view this hidden git folder, you can type:
// If using Git Bash
ls -a

// If using Windows command line
dir/a
"ls" is the command for listing the content of the directory. "-a" is short for "all". It means it's going to list all the content including hidden ones. This is a Linux command so if you are using Windows, this command won't work unless you use it in Git Bash, which is an emulator of the Linux command prompt. If you are using Window's command line, you must use the command dir/a, which means list directory all contents.
The .git folder is hidden with good reason. Users shouldn't touch its contents as this is where git stores history among other things. It shouldn't be altered manually.
How to remove hidden git directory
If you want to abandon this work directory or disable tracking. You can simply remove the hidden git folder inside the repository. To do this in Git Bash, type:
rm -rf .git-f means to force remove. Otherwise, it won't be able to remove it since the directory is hidden. -r stands for recursive deletion. Directories with content has to be deleted recursively.
For Windows, the command is rmdir.
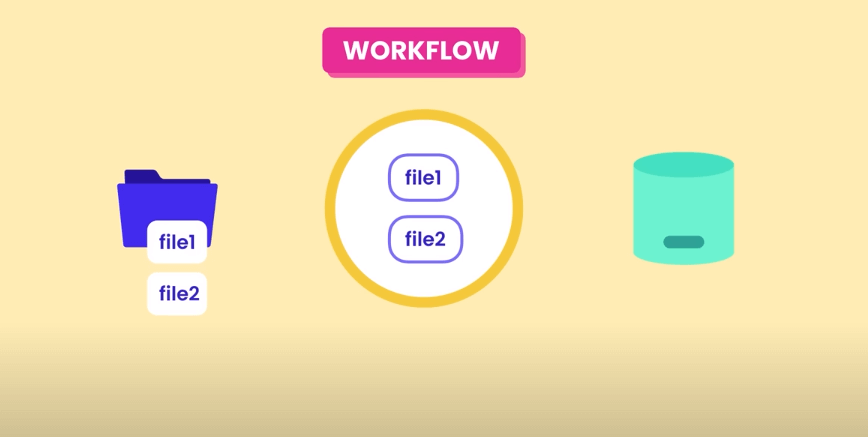
Workflow
The way Git works is that for every commit, it creates a snapshot of the repository and logs the changes so that aside from tracking, we will also be able to revert to previous versions in case we make mistakes or if we decide that the old version is better. We can also revert back to newer versions as long as the code changes has been successfully tracked.
In Git, the code moves from user's work directory into the staging area (or the index) before committing it where Git will take the snapshot of the code changes.
The Staging Area allows you to review your work before recording a snapshot. If some of the changes shouldn't be recorded as part of the next snapshot, we can unstage them and commit them as part of another snapshot.
Adding Files to Staging
To add files into the staging area, we use the command:
// For one file
git add file1

// For two files
git add file1 file2

// For all files and folders
git add .
file1 and file2 represents the name of the files in your work folder that you wanted to add into the staging area. You can add more files by separating them with space. You can also add files using a pattern, or you can add all by using period (.). Be careful with using the period though as you may add unwanted files by accident.
Committing Files
After reviewing the files and you found them to be good, you may now take snapshots using the command:
git commit -m "Initial Commit"-m stands for message. It is important to always put a message and the message must be clear and concise so that if you are working with other colleagues, they would know what was done or changed. For this example, our message is "Initial Commit" to let everybody know that this is the first commit.
During commit, it is good practice that we commit not too small or not too big changes. The purpose of version control is to track changes along the way. If you made big changes before tracking, then the purpose of tracking becomes pointless. Too small changes like merely correcting a typo is also unnecessary to track.
Note that during commit. The staging area is not emptied. Git makes comparison of the files in the staging and the recent snapshot, as well as tracks changes between the staging and the work folder. If there are changes between the staging and the work folder, Git will notify the user via git status, which we will discuss later. It won't also commit if you didn't go through the git add command process. Git has to know what files you wanted to commit.
Updating Files
We know that git add saves file into the staging area or into the index, but since the index never gets emptied, what happens to the file inside when we add a file bearing a similar file name to the one in the index? Well, an update happens! The file we add to the index updates the similar file name inside the staging/index.
Now, assuming you have two files in the staging, and you wanted only to update one file — file1. We can simply use the command:
git add file1And if this file is good and we want to take our snapshot, we do:
git commit -m "Fixed bug on file 1"Deleting Files
Now, here's another question. What happens if we decided that we no longer need file2 and we wanted to delete it?
Well, the proper way to do that is to do the same procedure. First, we delete file2 in our work folder, then do:
git add file2

git commit -m "Delete file 2"
As mentioned before, Git keeps on tracking our files and do comparison between the work folder and the staging. If you add file2, which can no longer be found in your work folder, Git will detect this and remove file2 in the staging area to mirror your work folder's status. And, when you commit this, Git will check between the staging and the recent snapshot, and if it founds that file2 is no longer in the staging, Git will also delete the one in the snapshot.
Commit History and Storage
When Git takes a snapshot, it creates an ID, Message, date/time, author, and the complete snapshot of the code. It does not store deltas or what was changed, it stores the full content, allowing git to restore a snapshot without having to compute the changes.
Git is very efficient storing snapshots. It compresses the content and doesn't store duplicates.
Tracking Files
To track changes, we can use the command:
git statusThis command shows the untracked files. If a file is not found in the staging, the file or folder will shows up in red.
If the file or folder has been recently added into the staging, this file or folder will appear green and will be marked as a new file.
If we did some changes to a file in the work folder, the file will come out red and marked as modified.
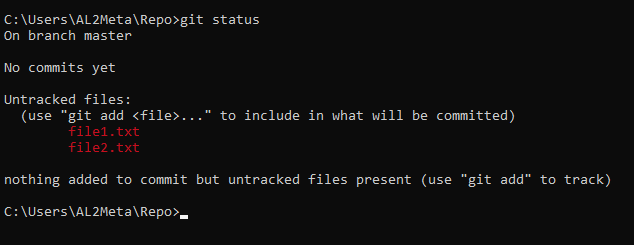
For example, let create file1.txt and file2.txt in our repository:
echo hello > file1.txt
echo world > file2.txt
The commands above will create file1.txt with the content "hello", and file2.txt with the content "world" in our repository.
If you call git status, this is what will come up:
If you add these files to index with git add file1.txt file2.txt command or use a pattern as in git status *.txt, this is what's gonna happen on the next git status:
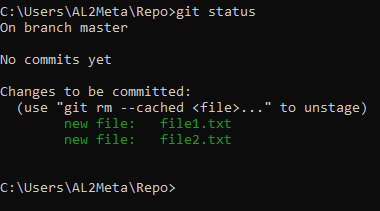
In our git status update, it states there that we haven't made any commits yet, and we have added two new files in the staging, thus, they appear in green and are marked as new files.
Now, let's add some texts into file1.txt in the work folder. You can do this by:
echo world >> file1.txt
This command adds another line in the file and appends the word "world".
If you use the command git status again, this is what you'll get:

git status now shows a modified file in red. It means that file1.txt in the work area doesn't match the similar file in the staging area.
To stage the file, do git add file1.txt to update file1.txt in the staging area.
If you check git status again, it will show you that there will are no more modified files, and you have files yet to be committed.
Committing stages without a message
Committing without -m opens VS code if a code editor has been configured earlier in our git config. In VS Code, Git will be asking you to make a message.
git commit without -m opens the code editor since Git requires that you enter a message, otherwise it will abort the commit. In the editor, you can see texts prefixed by #. All texts prefixed by the sharp character are ignored. In the non-prefixed line, write a message and save, then close the editor to initiate the commit.
Skipping the staging area
You can make a commit without going through the staging area. To do this, you can type the command:
git commit -a -m "Your Message"

// or

git commit -am "Your Message"
The -a or --all option means commit all changed files.
For example, let's modify file1.txt by doing:
echo test >> file1.txt
Then do commit using git commit -am.
What will happen is that Git will not really skip the staging, but rather update the staging and commit the changes both at once. So, the next time you call git status, this is what you'll get:

As you can see in the shell, it says that working tree is clean. There are no more modified files.
Removing Files the right way
If we delete a file by typing rm file2.txt in Git Bash or del file2.txt in Windows command to delete file2.txt from the work area, we get a deleted file2.txt in red during git status update.

Note that rm or del is not the right way to remove files because the files in staging remains. To check what staging has, type:
git ls-filesThis will show that staging still has file1.txt and file2.txt.
To remove the file file2.txt from staging, we need to enter git add file2.txt. If we do this, git ls-files will no longer show file2.txt, and git status will show deleted: file2.txt in green.

But there is actually a faster way to remove files, and it is also the right way.
Instead of deleting the file from the work area, do this instead:
git rm file2.txtThis will remove the file from both work and staging area. You can also delete multiple files separated by space or use patterns such as *.txt to delete all files with .txt extension.
Finally, to take the snapshot, do commit.
Renaming
You can rename a file in the work area by using the command mv in Git Bash or ren in Windows command prompt.
For example, we wanted to rename file1.txt to main.js.
// Git Bash or Linux
mv file1.txt main.js

// Windows
ren file1.txt main.js
Since file1.txt can still be found in the staging but Git can no longer find the file in the work folder, it will mark it as deleted, and since there is no main.js in the staging, it will mark main.js as an untracked file.

Normally, we would have to do git add file1.txt main.js to delete file1.txt and add main.js into the staging area.
However, the faster and correct way to do the renaming is not to directly rename the file in the work folder, but instead:
git mv file1.txt main.jsThe command will rename both files found in the work folder and the staging area. If you follow it up with git status, you will find that file1.txt has been renamed to main.js.

And if you do git commit, it will show you that there have been 0 insertions and 1 file changed.
Ignoring files
Let's do this:
// Makes a directorly called logs
mkdir logs

// Creates a log.txt file inside log directory
echo hello > logs/log.txt
Let's say we have some files that we wanted to exclude from tracking. For this example, we don't want logs/log.txt to be tracked and included in the snapshot as it doesn't have anything to do with our codes.
What we can do is to create a list and add it into a file .gitignore. Note that this file must have the period as the first character, and it has to be in our root. To create it in the terminal:
echo logs/ > .gitignoreTo edit .gitignore, you can do the command:
code .gitignoreVS Code will open .gitignore where we can edit the list. Here, you can add all the files and the folders you wanted to be excluded from tracking. For our example, we have the folder logs/. This means that Git will ignore the log directory and all of its contents.
Note that each file or folder you wanted excluded must be entered in a separate line. You may also use patterns to target multiple files.
If done properly, logs/log.txt will no longer be tracked and you can confirm this with git status. The only untracked file that will appear there is .gitignore.
To add .gitignore into staging, just do:
git add .gitignoreThen, you may commit it to record a history of .gitignore.
Note that this works only if you haven't already included a file or a directory in your repository. In other words, if you accidentally include a file in your repository and then later added it to .gitignore, Git is not going to ignore that.
For example, let's do:
mkdir bin
echo hello > bin/app.bin
git status
This will show that we have a new untracked files inside bin/.
Let's do:
git add .
git commit -m "Add bin"
Let's say app.bin is a constantly changing file. The problem with this is that every time we commit our code, Git is going to say that this file bin/app.bin has changed so we have to stage it and then commit it. It doesn't make sense why do we have to commit this file every time we compile our code. So, we add this folder to .gitignore's list. Then we stage and commit .gitignore.
logs/
bin/
However, despite the fact that we already listed bin/ in the .gitignore list, git status will still show that bin/app.bin has been modified.
Git is not going to ignore the changes in this directory because it's already tracking this directory. You can confirm this by typing git ls-files. The solution to this problem is to remove bin/app.bin from the index, but how do we do this without removing this file from our work folder?
So let's try typing:
git rm -hThis command will show us all the rm options.
Among the options, you can find --cached, which only remove files from the index. Since we only want to remove files from the index, this is the right parameter for us.
However, if you enter:
git rm --cached bin/You will get an error message "fatal: not removing 'bin/' recursively without -r". This command option cannot remove the folder if there are files inside. So you need to add -r to do recursive deletion. Our command should be:
git rm --cached -r bin/Now, if you do git ls-files, you will no longer find bin/app.bin in staging. Git status will also show deleted: bin/app.bin although we still have bin/app.bin in our work folder.
Finally, we can commit this to remove bin/app.bin from our snapshot.
If bin/app.bin changes again in our work folder, you will no longer find it changed in git status because git is already ignoring it.
To be continued
So there you have it, this tutorial has covered almost all of the basics. The next tutorial will be covering the remaining basic tutorials we haven't discussed here, including how to show a git status short summary, how to unstage, how to compare version history, and how to restore from a previous snapshot.